
The Best Way to Deploy Data Science Projects with Streamlit
Hint: It's not Streamlit Cloud

Impact.
It’s what separates good data scientists from great ones.
It’s what every employer is looking for in their next hire.
And it’s what defines your value as a data scientist.
But creating impact takes more than just technical skills. It’s not enough to build great models; you need to make them accessible and usable.
That’s why deployment is so important.
A model sitting in a Jupyter notebook isn’t doing anything. To create real value, you need to deploy it.
So today, I want to show you how to do just that using Streamlit
But going beyond the basic Streamlit Cloud.
This is the same method I’ve used to coach many of my mentees in the past, helping them build projects that impress hiring managers and get hired.
Here is what we’ll cover:
Why Streamlit Cloud isn’t enough
How to Dockerize your Streamlit app (practical guide)
Deploying a Dockerized Streamlit app
1. Why Streamlit Cloud Isn’t Enough
Nowadays, using Streamlit to bring your portfolio projects to life is a must. It’s a great way to show your ability to build projects end-to-end.
Well, sort of.
Most projects default to deploying using Streamlit Cloud. Just a few clicks, and it’s live for anyone to use. Easy! Great for quick prototypes.
But easy comes at a cost.
The technical skills don’t always transfer beyond Streamlit’s ecosystem. And the idea here is to show we can go beyond simple prototypes.
This is where Docker comes in.

With Docker, you’re no longer just deploying an app; you’re packaging it in a way that works anywhere.
And guess what? It’s the industry standard for containerizing in software development, including data science and machine learning workflows.
If you are new to Docker, I recommend you first read this article to familiarise yourself with the key concepts:

Otherwise, here is a quick look at our strategy:

Let’s break it down.
2. How to Dockerize Your Streamlit App (Practical Guide)
Deploying with Docker means you’re not just launching an app, you’re creating something that works anywhere.
But to do that, you need a Dockerfile, which works as a simple script that tells Docker how to package your app:
What dependencies to install
What files to include
How to run it.
Let’s see what that looks like
Minimal Dockerfile template (ready-to-use)
Here’s a simple Dockerfile that works for Streamlit.
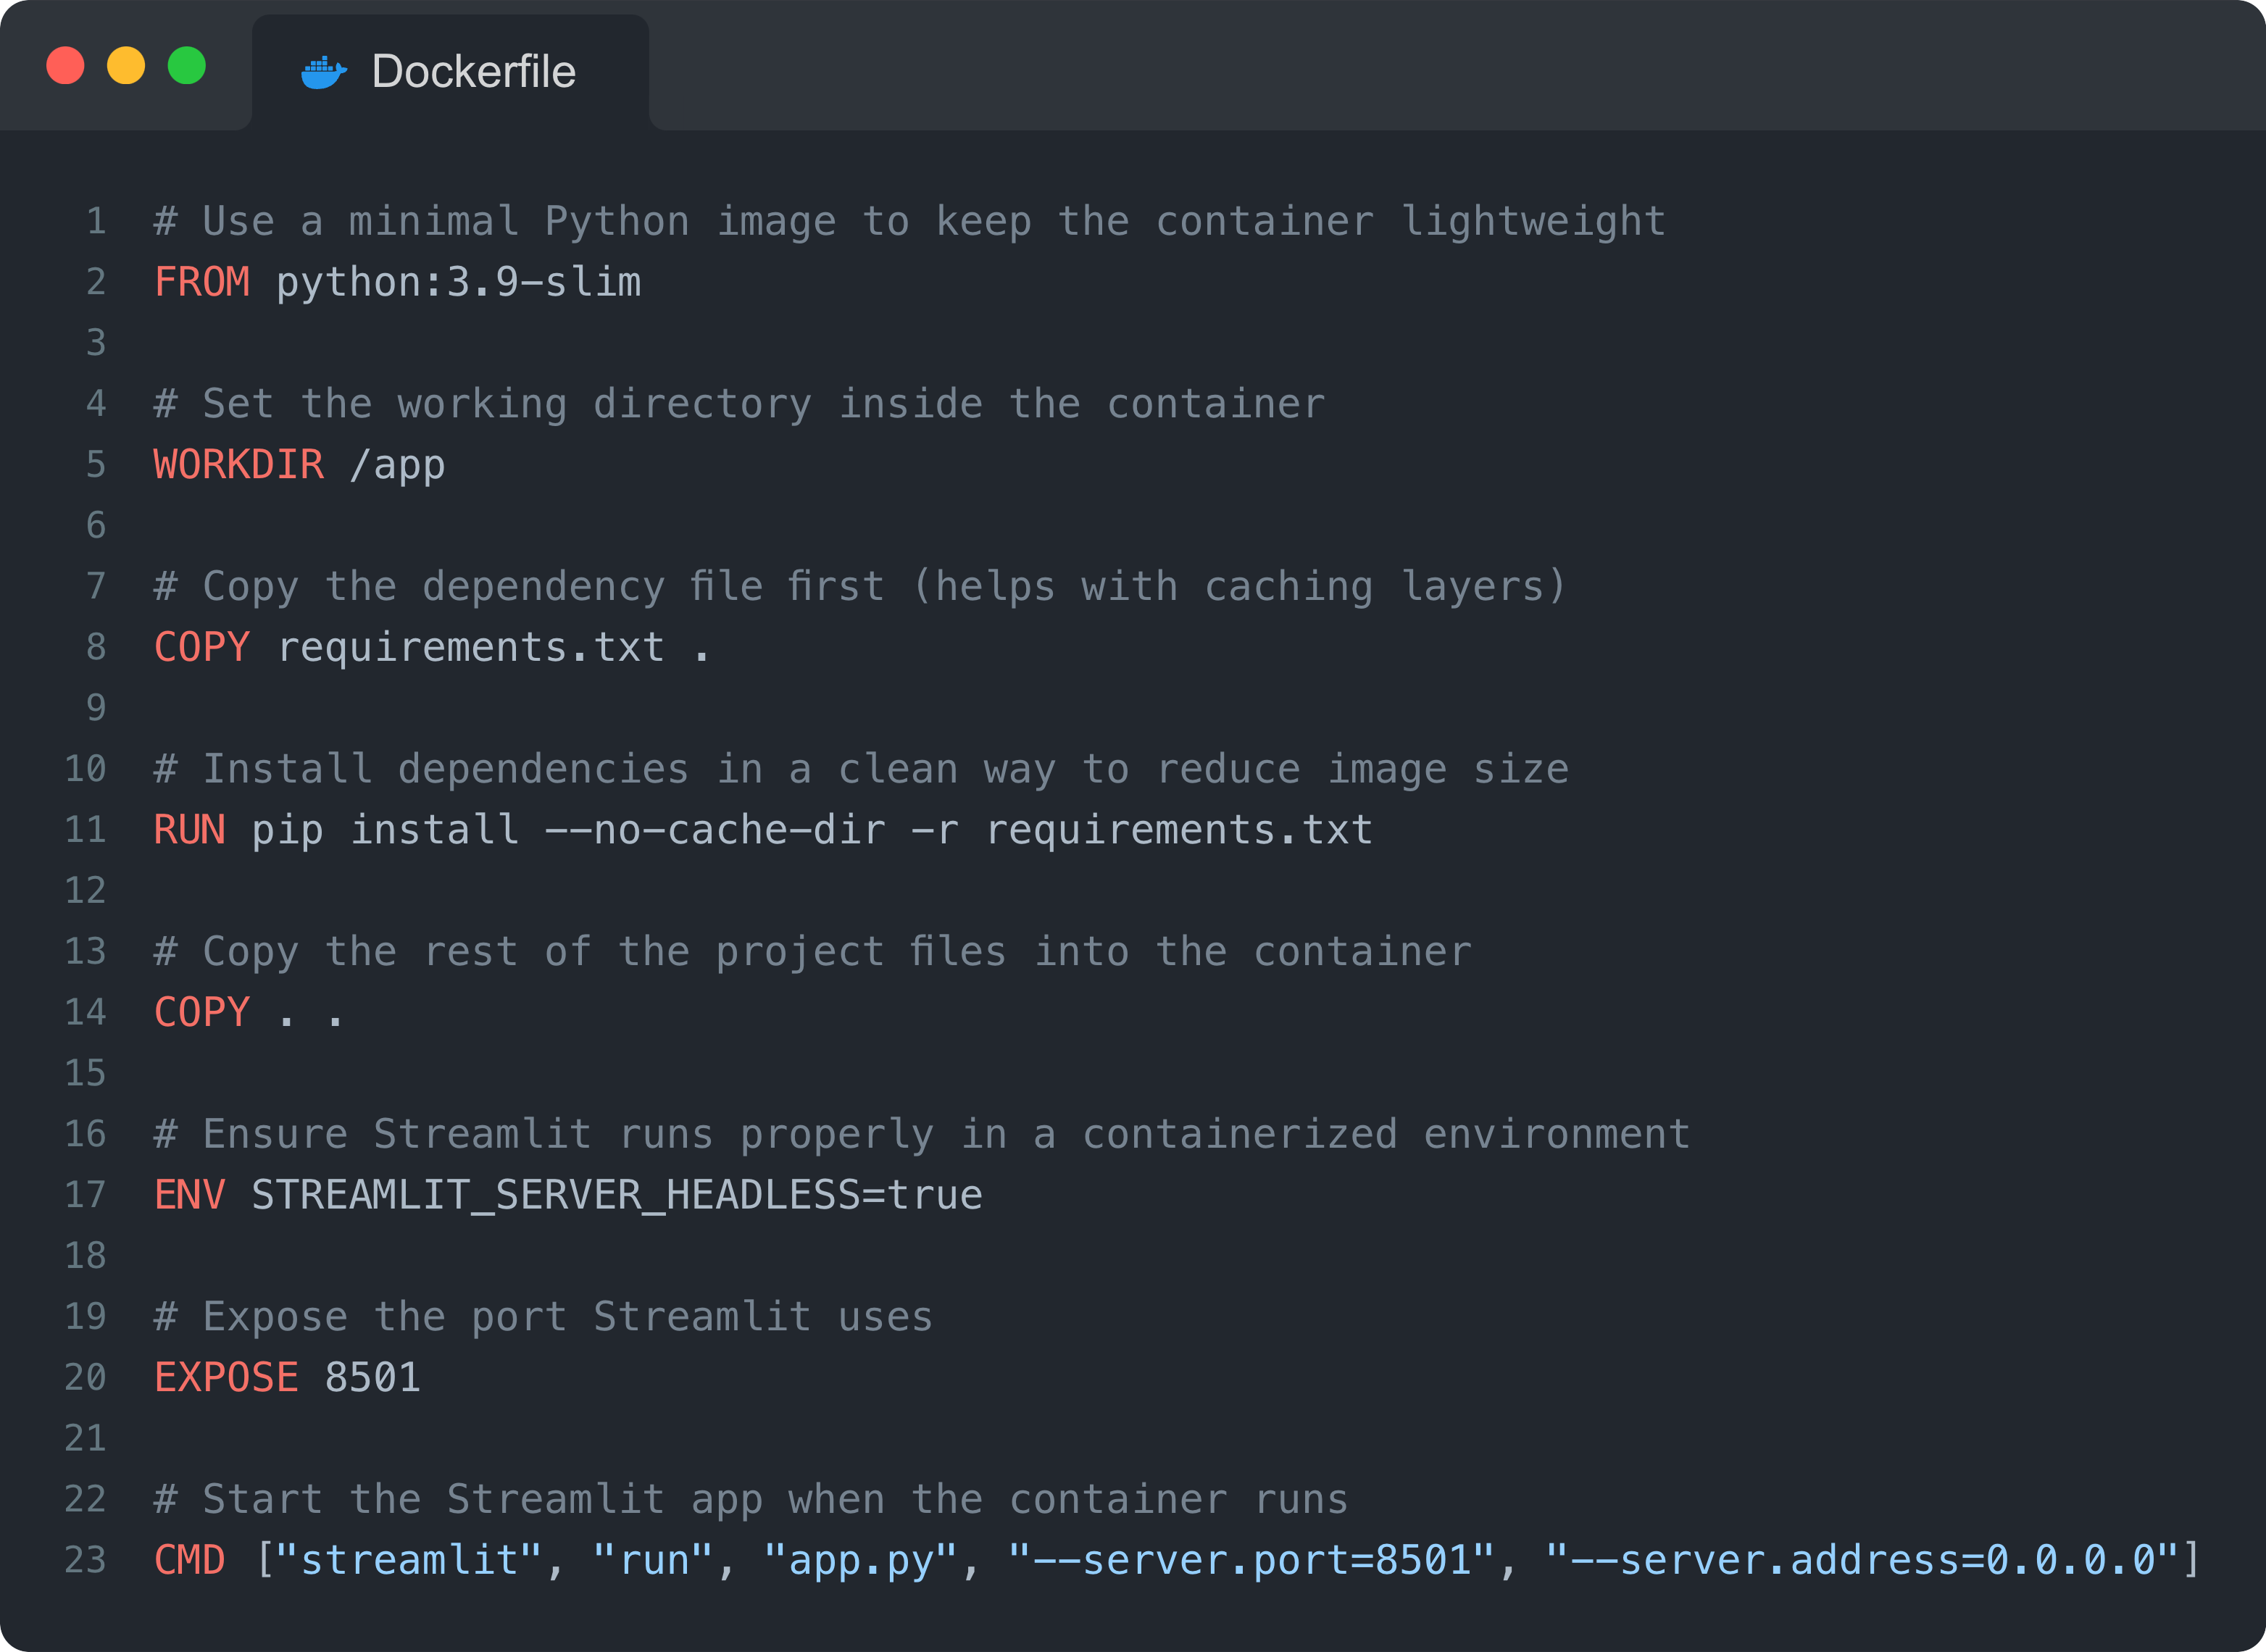
That’s it. Minimal, efficient, and does the job.
But of course, this is just a starting point. You can always tweak it to meet your specific needs (e.g., you can use a later version of Python).
You can download the exact template here.
Running your Docker container locally
Now, let’s test it before deployment.
Step 1: Build the Docker image (only needs to be done once):
docker build -t my-streamlit-app .Step 2: Run the container (this starts your app inside Docker):
docker run -p 8501:8501 my-streamlit-appStep 3: Visit http://localhost:8501 and boom, your app is running inside Docker.
At this point, you’ve Dockerized your Streamlit app. Now, let’s get it live.
3. Deploying a Dockerized Streamlit App on Render
Now that your app runs locally, it’s time to deploy it properly.
I recommend using Render.
Why Render?
Free tier (so you don’t burn cash while testing).
Supports Docker natively (which means no weird config issues).
Simple setup (no Kubernetes, no headaches).
Let’s deploy.
Simple steps to deploy a Dockerized app
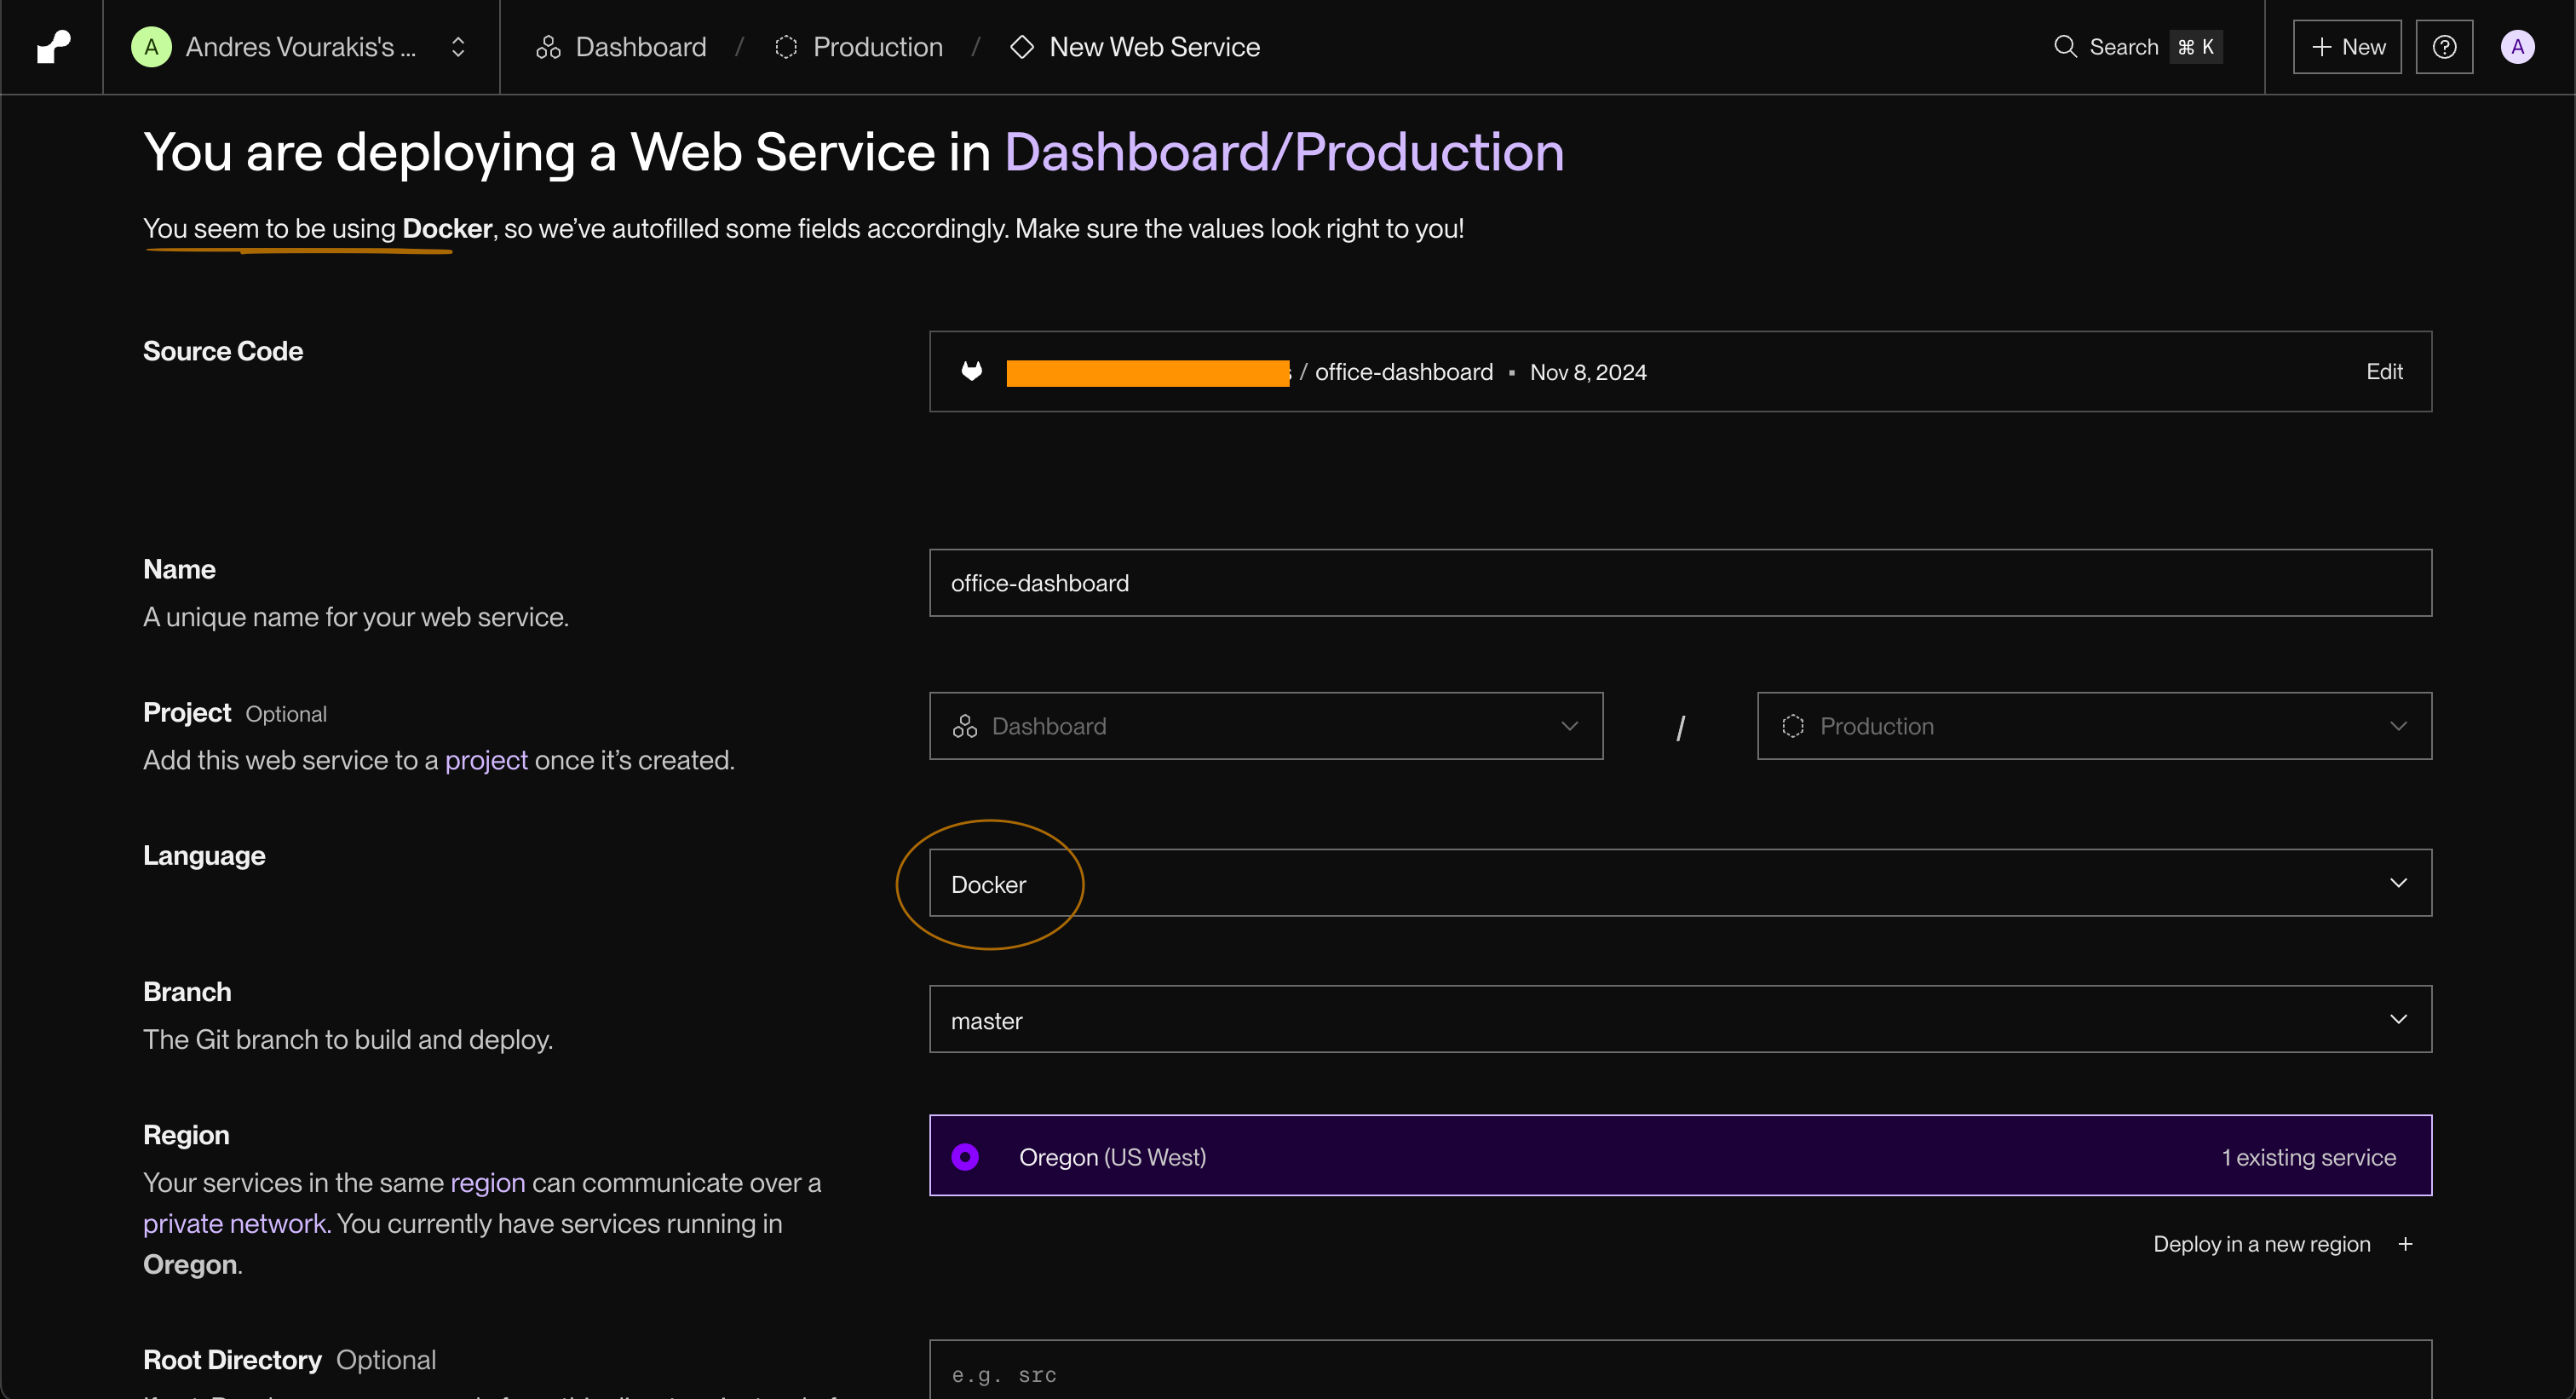
Push your project (with the
Dockerfile) to GitHub (if it’s not there already).Sign up on Render and create a new Web Service.
Connect your GitHub repo and select the branch with your
Dockerfile.Under “Language,” choose “Docker.”
Click “Deploy.”
💡 Render will automatically build your Docker image from your
Dockerfile, you do not need to push an image to a container registry.
Once it’s live, you’ll get a public URL to share your deployed project.
And just like that, you’ve taken your Streamlit project beyond just a “quick” prototype.
But…what if you already have a Docker image?
Alternatively, you can also use Render to deploy a prebuilt Docker image from a registry such as Docker Hub.
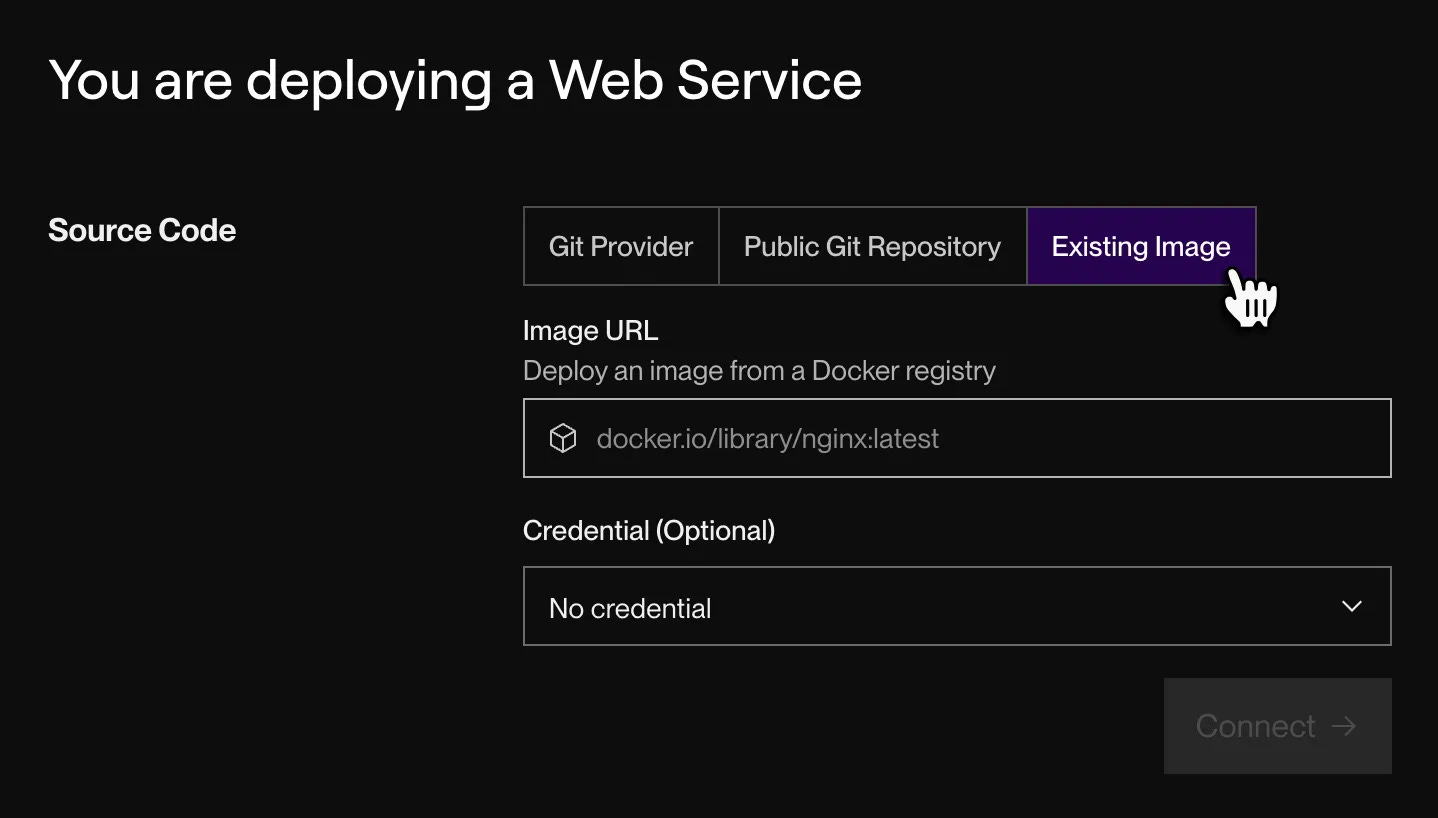
💡 This is useful when you want faster deployments or when the image is already built as part of a CI pipeline. In production teams, this is often the standard setup: build once, deploy many times.
Here is the full documentation for this approach.
Just know that both approaches are valid. The difference is where the image is built and how that build step is managed.
Ultimately, the real goal is to use Docker to make your application portable and reproducible, turning a local project into something that can be reliably deployed in a real environment.
A couple of other great resources:
🚀 Ready to take the next step? Build real AI workflows and sharpen the skills that keep data scientists ahead.
💼 Job searching? Applio helps your resume stand out and land more interviews.
🤖 Struggling to keep up with AI/ML? Neural Pulse is a 5-minute, human-curated newsletter delivering the best in AI, ML, and data science.
Thank you for reading! I hope you found these tips insightful.
See you next week!
- Andres
Before you go, please hit the like ❤️ button at the bottom of this email to help support me. It truly makes a difference!
Nice article. I think Hugging Face is also a great option for deployment as it doesn't cost you. Once dockized we can just deployment in Hugging Face.
Since many have shifted from PIP to UV. Below is the minimal Dockerfile template
FROM python:3.11-bullseye
WORKDIR /app
# Install uv
RUN pip install --no-cache-dir uv
# Copy dependency files first
COPY pyproject.toml uv.lock ./
# Install dependencies (creates .venv)
RUN uv sync --frozen
# Ensure venv binaries are used
ENV PATH="/app/.venv/bin:$PATH"
# Copy application code
COPY . .
#Expose the port for streamlit users
EXPOSE 8501
# Run streamlit app
CMD ["streamlit", "run", "app.py", "--host", "0.0.0.0", "--port", "8501"]